---
title: Build Your Skills Passport
description: Learn how to add certifications, licences, and experience to your Skills Passport, and how to find and manage them.
---
[Skip to content](https://help.klayo.com/build-your-skills-passport#main-content)
[](https://help.klayo.com/)
Open main navigation
Close main navigation
- [Contact Support](https://klayo.com/about#contact)
[Contact Support](https://klayo.com/about#contact)
How can we help you?
- There are no suggestions because the search field is empty.
1. [Knowledge Base | Klayo](https://help.klayo.com/)
2. [Your Career](https://help.klayo.com/your-career)
3. [Skills Passport](https://help.klayo.com/your-career#skills-passport)
# Build Your Skills Passport
## How to add skills, certifications, and licences to your Skills passport.
---
Your Skills Passport is your personal, private space to store and showcase your professional achievements. It's free, and it's always yours.
You can use it to store:
- Certifications and licences from completed training
- Work experience and on-the-job accomplishments
- Verified skills, with expiry tracking
- Anything you want to share publicly, or keep private
Your data, your control: everything you add is private by default. You decide what to share, and with whom.
### Add a skill
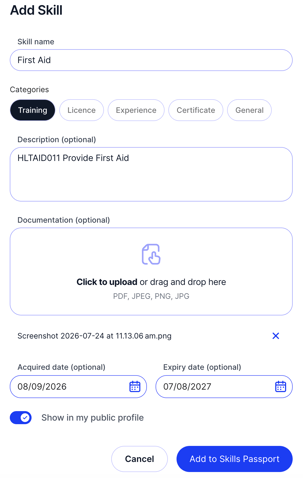
1. Go to **Skills Passport**.
2. Select **Add Skill**.
3. Enter a **Skill name**.
4. Choose a category:
1. **Training:** a course or program you've completed.
2. **Licence:** an official permit or authorisation to perform a role or task.
3. **Experience:** on-the-job accomplishments or practical exposure.
4. **Certificate:** a formal credential from an accredited course or provider.
5. **General:** anything else that doesn't fit the categories above.
5. Add a **Description** (optional) — issuing body, scope, or other context.
6. Upload **Documentation** (optional) — PDF, JPEG, PNG, or JPG.
7. Add an **Acquired date** and **Expiry date** if relevant.
8. Turn on **Show in my public profile** if you want this skill visible to others.
9. Select **Add to Skills Passport**.
### Read your Skills Passport
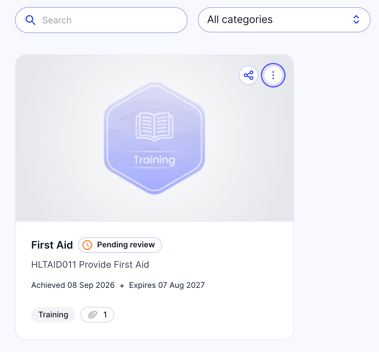
1. Use **Search** or the **All categories** filter to find a specific skill.
2. Select a skill card to view its details.
3. Select the three dots on a card to edit or manage it, or the share icon to share it.
- [Get started](https://help.klayo.com/get-started#main-content)
- [Your account](https://help.klayo.com/get-started#your-account)
- [Free vs paid](https://help.klayo.com/get-started#free-vs-paid)
- [Learning & Courses](https://help.klayo.com/learning-courses#main-content)
- [Access training](https://help.klayo.com/learning-courses#access-training)
- [Complete a course](https://help.klayo.com/learning-courses#complete-a-course)
- [Your Career](https://help.klayo.com/your-career#main-content)
- [Skills Passport](https://help.klayo.com/your-career#skills-passport)
- [Career Explorer](https://help.klayo.com/your-career#career-explorer)
- [Managing People](https://help.klayo.com/managing-people#main-content)
- [Enrol students](https://help.klayo.com/managing-people#enrol-students)
- [Report](https://help.klayo.com/managing-people#report)
- [Pre-paid accounts](https://help.klayo.com/managing-people#pre-paid-accounts)
- [Workforce Solutions](https://help.klayo.com/workforce-solutions)
- [Accounts, Seats & Billing](https://help.klayo.com/accounts-seats-billing)
[](http://klayo.com)
Copyright © 2026, Ceventas Pty Ltd